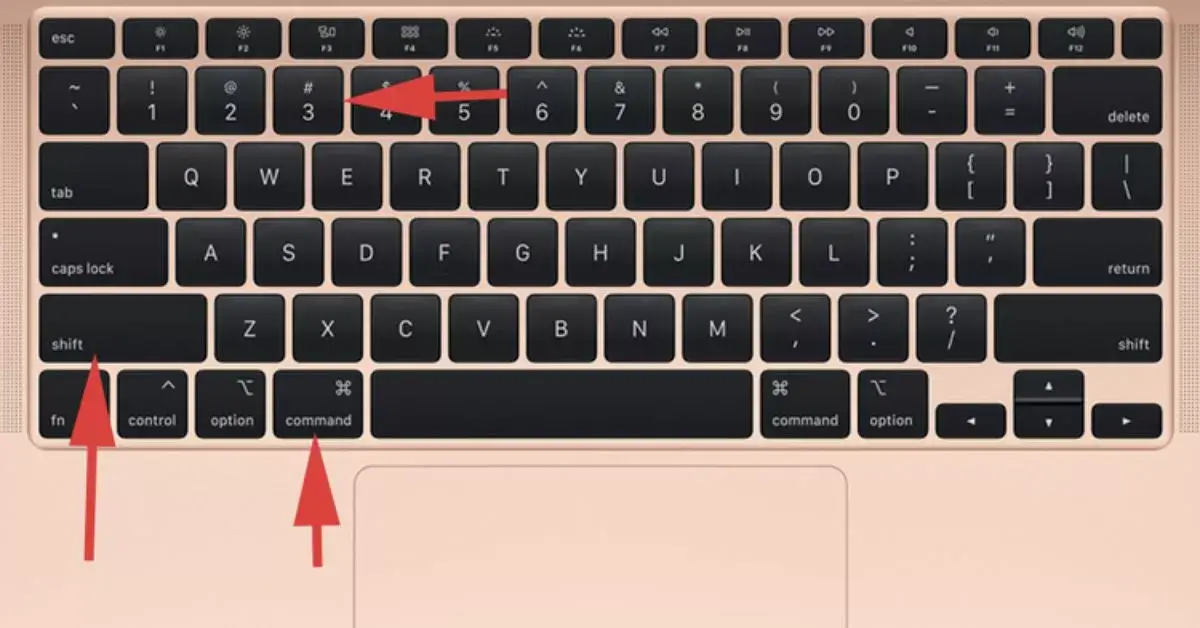
Taking a screenshot on a Mac is a fundamental skill that can come in handy for various purposes, whether you need to capture a memorable moment, save information for reference, or share something interesting with others. In this comprehensive guide, we will explore all the methods available for “how to take screenshot on mac, along with tips and tricks to enhance your screenshot-taking efficiency.

How To Take Screenshots on Mac?
Screenshots, or screen captures, are digital images of what’s displayed on your computer screen at a particular moment. On a Mac, taking screenshots is an essential skill that allows you to capture everything from your favorite online articles to memorable moments in video games. It’s a versatile tool with numerous applications in work, education, entertainment, and more.
Whether you’re a seasoned Mac user or a newcomer to the platform, understanding how to take screenshots efficiently can significantly enhance your digital experience. In this comprehensive guide, we’ll explore all the methods available for taking screenshots on a Mac, from capturing the entire screen to selecting specific portions, recording video clips, and much more.
So, whether you’re an aspiring digital artist, a diligent student, a professional presenting to clients, or simply someone who enjoys sharing interesting content with friends and family, this guide has something for everyone. Let’s dive into the world of Mac screenshots and unlock the full potential of this valuable tool.
Methods for Taking Screenshots
Method 1: Capturing the Entire Screen
How to take a screenshot of the entire screen:
- Press Command + Shift + 3: This keyboard shortcut captures the entire screen.
- Save the screenshot: The screenshot is automatically saved to your desktop with a filename like “Screenshot [date] at [time].png.”
Customizing screenshot settings:
- Changing the file format: You can change the default PNG format to other formats like JPEG.
- Excluding the shadow: By default, macOS adds a shadow to screenshots of windows. You can disable this feature.
Why capture the entire screen?
- Useful for capturing everything on your screen quickly.
- Ideal for saving web pages, game moments, and more.
Method 2: Selecting a Specific Area
How to capture a specific portion of the screen:
- Press Command + Shift + 4: This keyboard shortcut changes your cursor to a crosshair.
- Drag and select: Click and drag to create a rectangular selection around the area you want to capture.
- Release: Release the mouse button to capture the selected area.
- Save the screenshot: The screenshot is saved to your desktop.
Saving and editing the cropped screenshot:
- After capturing a specific area, the screenshot appears as a file on your desktop.
- You can further edit or annotate it using the Preview app.
Why capture a specific area?
- Allows you to focus on a particular part of the screen.
- Great for highlighting text, images, or details in documents or webpages.
Method 3: Taking Screenshots of Specific Windows or Apps
How to capture a single window or application:
- Press Command + Shift + 4: This keyboard shortcut changes your cursor to a crosshair.
- Press the Spacebar: Your cursor turns into a camera icon.
- Click on the window or app: Click on the window or app you want to capture.
Ensuring clean and focused window screenshots:
- The screenshot includes only the selected window or app, without any surrounding elements.
- Ideal for presentations, tutorials, or showcasing a specific application.
Method 4: Capturing the Touch Bar (for MacBook Pro users)
How to take a screenshot of the Touch Bar:
- Press Command + Shift + 6: This keyboard shortcut captures the Touch Bar.
- Save the screenshot: The screenshot is saved to your desktop.
Navigating Touch Bar screenshot settings:
- You can customize options like format and shadow settings.
Why capture the Touch Bar?
- Useful for showcasing Touch Bar interactions in tutorials or documenting its appearance.
Method 5: Recording a Screenshot Video
How to record a video of your screen:
- Press Command + Shift + 5: This keyboard shortcut opens the screenshot toolbar at the bottom of the screen.
- Choose the “Record Selected Portion” option: This allows you to record a specific area.
- Click “Record”: Start recording your screen.
- Stop recording: Click the “Stop” button in the menu bar at the top of the screen.
- Save the video: The recorded video is saved to your desktop.

Configuring video recording settings: You can adjust settings like video quality and microphone input and why record a screenshot video? Perfect for creating tutorials, demonstrations, or capturing gameplay.
These are the primary methods for taking screenshots on a Mac. Depending on your needs and preferences, you can choose the method that best suits the situation. In the next section, we’ll explore advanced screenshot techniques and additional customization options to further enhance your screenshot-taking capabilities, so don’t forget to bookmark our site.
