Chromebooks are known for their simplicity and efficiency, making them a popular choice for students, professionals, and casual users alike. One essential skill for any Chromebook user is taking screenshots.
Whether you need to capture a funny meme, save a webpage for reference, or create a tutorial, knowing how to take a screenshot on a Chromebook is a must. In this comprehensive guide, we will explore various methods and tips to help you become a screenshot pro on your Chromebook.

1. Why Taking Screenshots on a Chromebook Matters
Understand the importance of screenshotting in everyday computing. Screenshots are digital images capturing the contents displayed on your Chromebook’s screen at a specific moment. The ability to take screenshots is a versatile tool with countless applications. Here are some scenarios where taking screenshots on your Chromebook matters:
- Education: Students can capture lecture slides, notes, or important information from online courses.
- Work: Professionals can document issues, create visual reports, or capture crucial data.
- Troubleshooting: Screenshotting can assist in diagnosing technical issues when seeking help from support.
- Collaboration: Sharing screenshots helps communicate ideas, provide feedback, or report bugs.
- Content Creation: Bloggers, content creators, and designers use screenshots for tutorials, graphics, and illustrations.
- Entertainment: Saving memes, funny moments in games, or interesting web content for later enjoyment.
- Reference: Saving web articles, recipes, travel information, or DIY instructions.
- Memories: Capturing special moments, messages, or social media posts to reminisce or share with others.
In essence, knowing how to take screenshots on your Chromebook is a valuable skill that can enhance your productivity, creativity, and the overall usability of your device. With this guide, you’ll become a master of capturing what’s on your screen with ease and precision.
2. Getting Started: The Basic Screenshot Method
Learn how to capture the entire screen with a single key combination.
Taking a screenshot of your entire Chromebook screen is one of the most common and straightforward methods. Here’s how to do it:
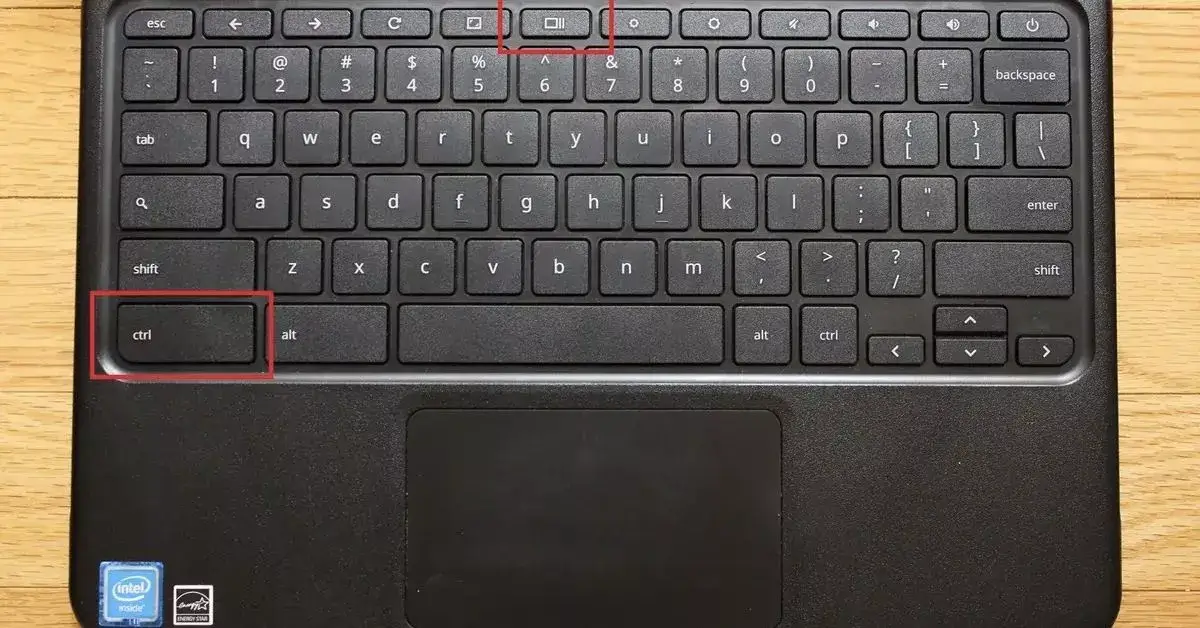
Step 1: Locate the “Show all open windows” key.
- Look at your keyboard, and you’ll find a key that resembles a square with two vertical lines on the right side.
Step 2: Take the screenshot.
- Press the “Show all open windows” key. This key is usually labeled as “F5” or “F6,” but it may vary depending on your Chromebook model.
Step 3: Save the screenshot.
- After pressing the key, your screen will briefly dim, indicating that the screenshot has been taken.
- The screenshot is automatically saved to your “Downloads” folder, typically with a filename like “Screenshot [date and time].png.”
Tips:
- To access your “Downloads” folder, click the launcher icon (bottom-left corner), then select “Files,” and navigate to “Downloads.”
- You can customize the screenshot’s file format (PNG, JPG, or WebP) by going to “Settings” > “Advanced” > “Downloads” > “Images” > “Image type.”
- Pressing “Ctrl” + “Show all open windows” key (F5 or F6) captures the screen and saves it directly to your clipboard for easy pasting into other applications.
This basic method allows you to capture your entire screen effortlessly. However, you might not always need a screenshot of everything on your screen. In the next section, we’ll explore how to capture specific areas of your Chromebook’s display.
Read More-
- How To Take Screenshot on Mac: Ultimate Guide To Capture Screen Like A Pro.
- How to get backlinks for a new site without money.
3. The Selective Approach: Capturing Specific Areas
Discover how to take screenshots of a specific portion of the screen.
Capturing a specific area of your Chromebook screen is particularly useful when you want to focus on a particular detail or extract specific content from a webpage, document, or image. Here’s how to do it:
Step 1: Open the “Screenshot” tool.
- Press “Ctrl” + “Shift” + “Show all open windows” key (F5 or F6) to open the “Screenshot” tool. This key combination will change your cursor to a crosshair.
Step 2: Select the area to capture.
- Click and drag your cursor to create a rectangular selection around the area you want to capture.
Step 3: Capture and save the screenshot.
- Release the mouse button to capture the selected area.
- The screenshot is saved automatically to your “Downloads” folder.

Tips: While selecting an area, you can see the dimensions of the selection in pixels, helping you capture precisely what you need. To cancel a selection, press the “Esc” key before releasing the mouse button.
Access the “Downloads” folder to find your captured screenshot, as mentioned earlier. This method allows you to capture specific details, images.
